Loading...
Loading...
Loading...
Loading...
Loading...
Loading...
Loading...
Loading...
Loading...
Loading...
Loading...
Loading...
Loading...
Loading...
Loading...
Loading...
Loading...
As soon as you create a new deployment, we automatically create a URL (your deployment link) and a QR code that you can use instantly.
This is the link which you can share with your audience. You can also edit the last part of this link to whatever you want.
As an example, the link from the screenshot above is https://rnghud.gmetri.com/my_first_metaverse
In this example, rnghud is your automatically generated organization alias, a 6-character string. You can find your organization alias by creating a deployment, or by following the steps .
You can customize the name - the my_first_metaverse part of the link from the example above - by clicking the edit button to its right. This name must be unique across your projects.
You can share this QR code with your audience so they can view this deployment.
You can export the experience as a SCORM package to use in your LMS. Both SCORM 2004 and SCORM 1.2 are supported.
Once you're happy with your experience, you can share it with your audience by creating a deployment using the "Publish" tool.
You can create multiple deployments for every experience you create.
To publish your experience simply click the 'Publish' button.
You can share your deployment with your audience in multiple ways
You can create multiple deployments (and therefore deployment links) for every experience. So the same experience can be accessed with different links, with different access methods and multiplayer settings.
For every individual deployment, you can customize the following:
you can share the deployment link using different methods
you can choose to authenticate differently from other deployments
you can choose different collaboration features
you get a unique analytics link (top right of the deployment section)
Enabling this shows a map in analytics showing you the approximate location of viewers.
you choose a different location tracking setting


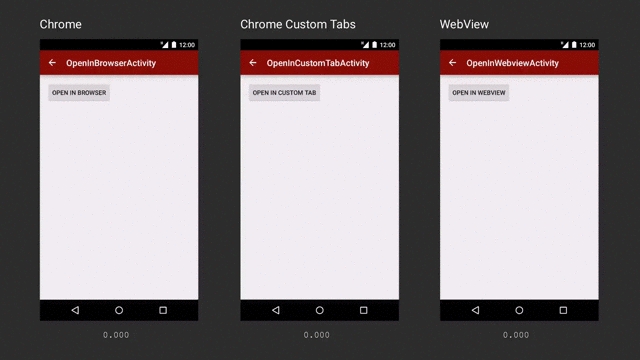
There are various ways of embedding GMetri experiences within a React Native iOS/Android app.
We recommend using this library.
Above library has the following behaviour:
Android:
If Chrome is installed, open the URL in Chrome.
You can customize look & feel.
If Chrome is not installed, open in other browser.
iOS:
If Chrome is installed, open the URL in it.
If it is not installed, open in Safari.
Integration within apps works by running the link generated above of an iframe(web) equivalent in the app.
Custom Tabs is a browser feature, introduced by Chrome, that is now supported by most major browsers on Android. It gives apps more control over their web experience, and makes transitions between native and web content more seamless without having to resort to a WebView.More documentation can be found .
There are 2 implementations that can be used namely WKWebView and SFSafariViewController. Both these implementations are similar to android’s chrome custom tabs implementation but have their own set of use cases. We recommend using SFSafariViewController to run GMetri experiences within your app to get the full immersive experience. Documentation for both can be found here:
WKWebView :
SFSafariViewController :
To run GMetri experiences inside android apps, we recommend an implementation of Chrome Custom Tabs API. Detailed information on how to setup an android experience with Chrome Custom Tabs can be found in this .
Also checkout this if you need authentication on GMetri experiences within your android app.
In your android experience add the required dependencies for Chrome Custom Tabs. Following is an example of gradle build dependencies:
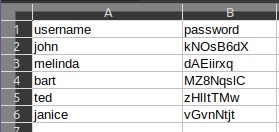
Sometimes you may need a custom list that requires a login identifier other than an email (eg, phone numbers, special usernames, etc). In such cases, you can simply rename the columns to the desired name and it will show up in the login form.
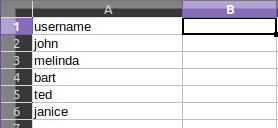
The second column in the csv is treated as the password field (regardless of what you reaname it to). If it is present the csv, we will authenticate all your users against the provided passwords. If you wish to skip password verification, remove this column from the csv.
A sample CSV containing some users with their names and an arbitrary password will look like:
A sample CSV containing some users with only their names and no password will look like:
From this experience , copy 2 files: ChromeCustomTabs.java and ServiceConnectionCallback.java into your android experience. These files together provide the interface for chrome custom tabs to run GMetri experiences.
The className ChromeCustomTabs.java implements 2 public methods:
initialize(String url, Context context)
launch()
Arguments:
url - Url of the experience
context - Context of your activity (this)
An example implementation of the above classes:
To enable GMetri XR experiences within an Android app, the app needs to implement the Chrome CustomTabs API as described in this article.
Chrome CustomTabs remove the restrictions imposed by WebViews on serving XR content. While WebViews don't share their state with the Chrome browser, ChromeCustomTabs are fully embeddable browser extensions capable of doing anything that a native Chrome browser can do.
Chrome CustomTabs give apps higher control over web experience and make transitions between native and web content seamless without having to resort to a WebView.
Add a rule for when you want the viewer to move to the new deployment.

dependencies {
    implementation fileTree(dir: 'libs', include: ['*.jar'])
    implementation 'com.android.support:appcompat-v7:26.1.0'
    implementation 'com.android.support:customtabs:26.1.0'
} ChromeCustomTabsJwt chromeCustomTabs = new ChromeCustomTabsJwt();
chromeCustomTabs = new ChromeCustomTabs();
String url = "https://view.gmetri.com/v4/game/safehands_v2";
chromeCustomTabs.initialize(url, this);
chromeCustomTabs.launch();
The viewer can login using their social credentials like Google or Facebook/Instagram account to access your experience
This allows you to link multiple deployments. Selecting this option makes this deployment visible in the “Open Deployment” rule while you build another experience.
This option allows anyone to access your experience, but GMetri assigns a viewer id to track history. So when the same person accesses the experience again from the same device and browser, their variables or progress would remain intact.
There are a lot more authentication mechanisms you can use:
Many of the above authentication mechanisms can be setup from the Viewer Group section.

This option generates a list of passwords which expire after a certain duration of hours. This expiry timer starts only after the first use of each password. Also to be specified is the time frame within which the Experience can be viewed.
Configuration:
Number of passwords to add
The number of passwords you want to add to the list of already generated passwords.
Duration in Hours
Once a password is used for the first time, it can only be reused until this duration of hours. After this duration is reached, this password will expire.
Start Date
Once you fill all the fields and click on save, a list of generated passwords become available for you to download. You may share this list with your intended viewers with which they can log in to view the Experience.
On resetting the duration for this viewer group, the duration is reset to the new value for all old used and unused passwords as well.
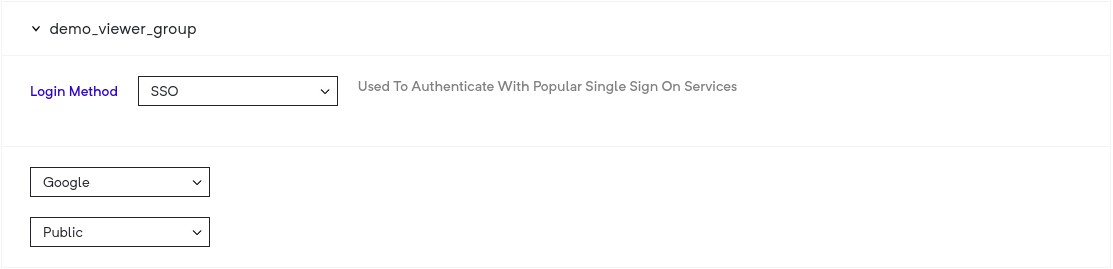
This option allows you select either Google, Microsoft (Azure) or SAML based login for viewers.
When you use this, you have three options:
Public - all people with valid (google or azure based on your selection) accounts are allowed to access your deployment.)
Filter By domain - all people with valid google or azure based accounts on the domain that you have set are allowed to access your deployment.
Filter By viewer list - all accounts google or azure based accounts in your viewer list are allowed to access your deployment.
This is a viewer group authentication mechanisms support for the .
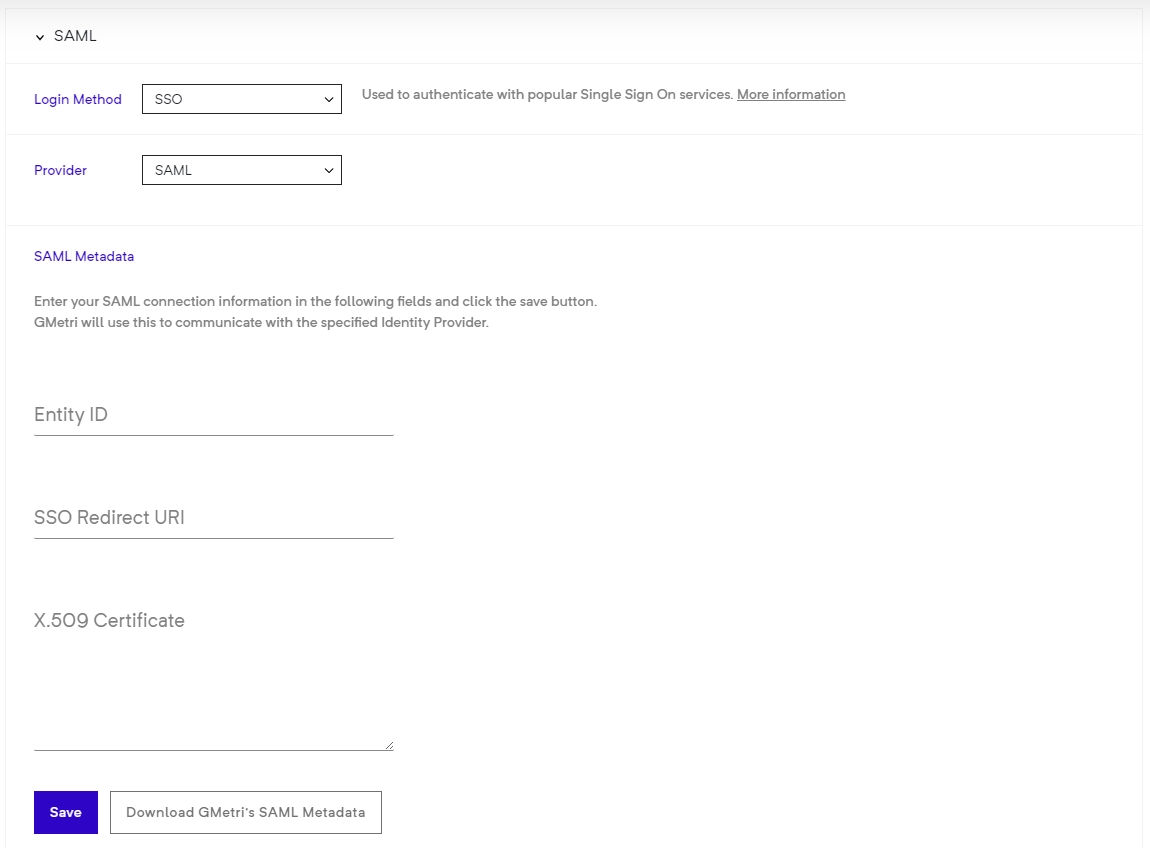
Any SAML identity provider (IdP) can be configured to be used for authentication of a viewer.
To enable this, head over to the Viewer Group page, then:
Select SSO as your Login Method.
Now select SAML from the Provider drop-down menu.
After this, you will be asked to provide your SAML IdP configuration.
You should see the config as follows:
Enter your IdP's entityId, SSO redicrection URL and X.509 signing certificate.
Click the Save button to finally save your configuration.
To register GMetri as a service provider (SP) with your IdP, you will need the configuration details. You can get these details by clicking the
You can find sample metadata configuration under the SAMLtest's IdP section. This will give you an idea of what you need to paste in the boxes for the SAML config.
NOTE on pasting X.509 certificate
Please paste certificate without the ----BEGIN CERTIFICATE---- and ----END CERTIFICATE---- part.
Once you create a SAML viewer group, head to your deployment and set this viewer group as the authentication mechanism for that deployment.
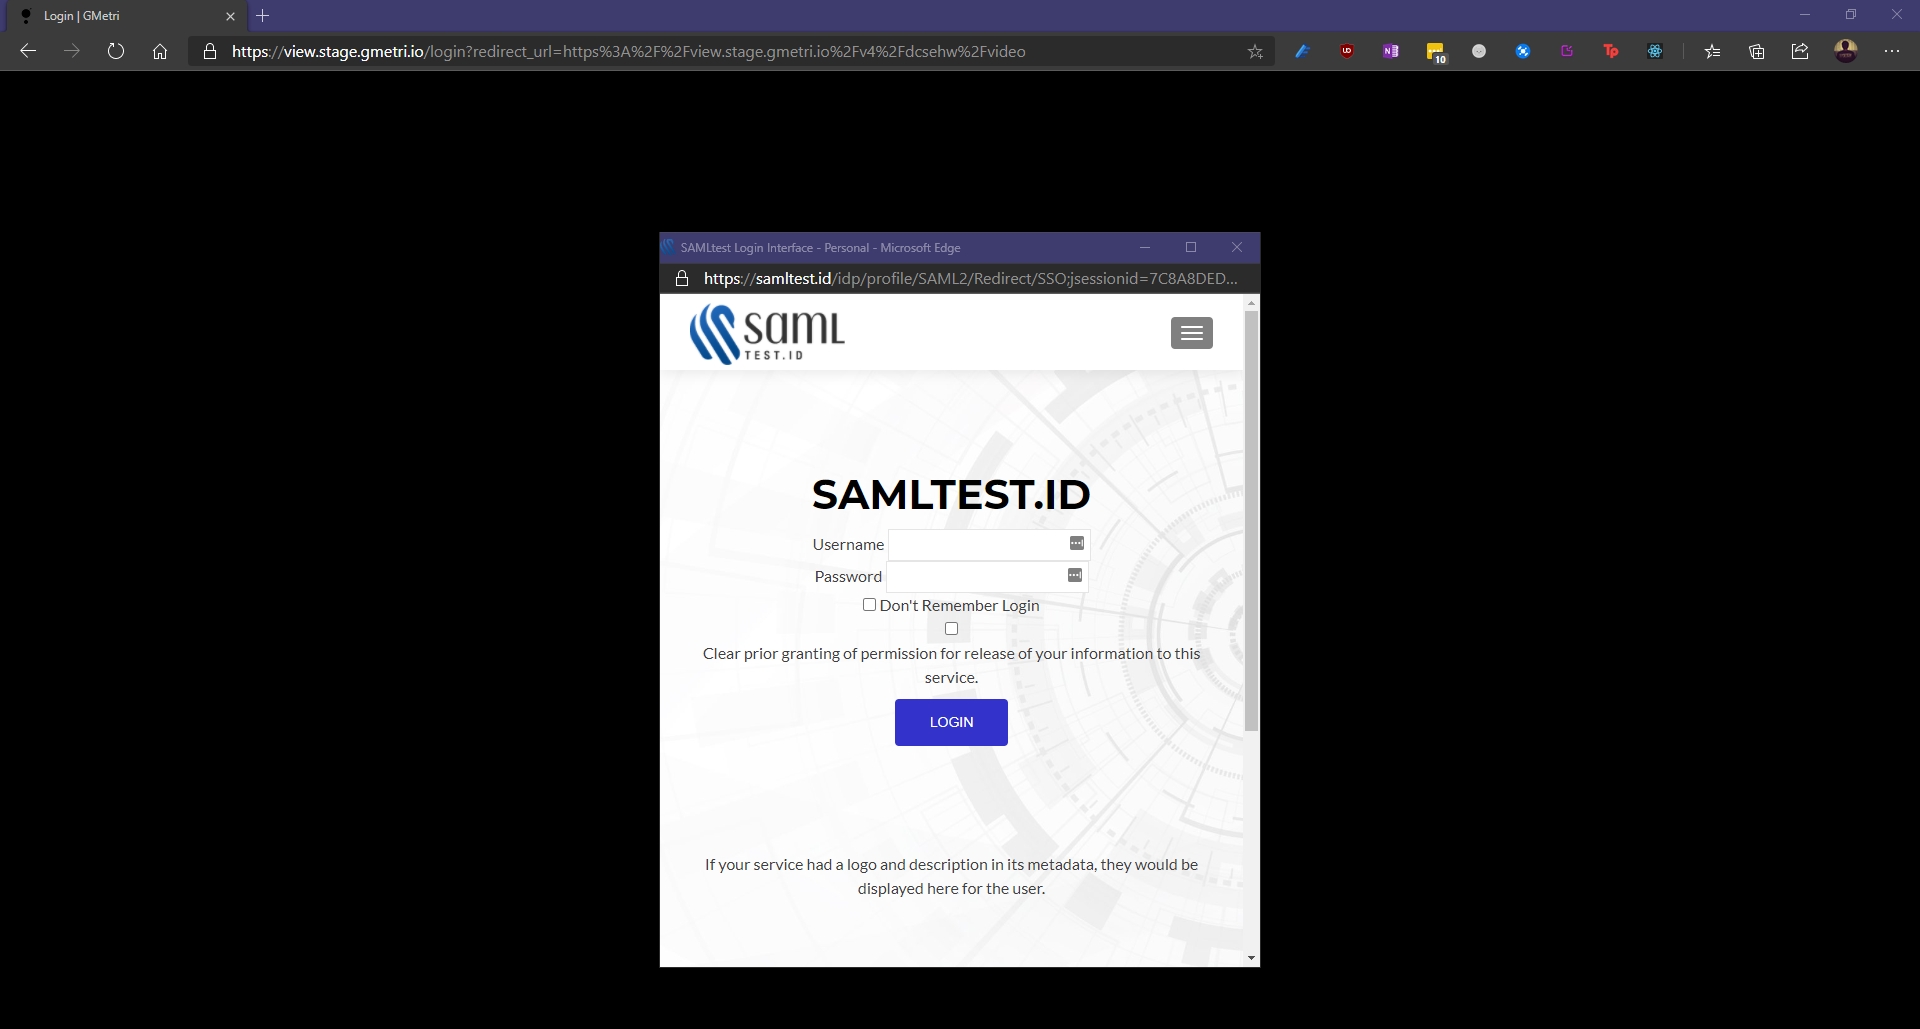
Once you open a viewer link for deployment with a SAML SSO based viewer group, you will see a pop-up with the IdP's login page.
Post-IdP login process, you will be redirected back to view.gmetri.com.
We use your email address sent to us by the IdP as the primary identifier for the viewer session.
Name Identifier format: urn:oasis:names:tc:SAML:1.1:nameid-format:unspecified
In IdP SAMLResponse we look for the following attributes:
This allows your viewers to login by entering their email and an OTP. You can also whitelist the domains you want to allow, or directly select most commonly used email domains like gmail.com/outlook.com etc.
To authenticate your deployment with the Email with OTP option, you first need to create a (steps below). And then select that viewer group as the access method for the deployment in question.
Publishing a Metaverse as a Full-Page Website
Copy the <html> code from the "Other" tab and paste it on your website to host the Metaverse as a Full Page website.
You can easily create a website that is a full-page Metaverse by copying the <html> code from the section and pasting it as the only thing on your page.
To set up a full-page Metaverse website, just copy the
All GMetri experiences can be exported as web SCORM packages and imported into any LMS. We support SCORM 1.2 and SCORM 2004 package versions.
After you are done creating your experience, follow the steps below to generate a SCORM package for your content.
Make the deployment live.
The date after which the Experience can be viewed. Counted from this date, 00:00IST onwards.
End Date
The date after which the Experience cannot be viewed. Counted from this date, 23:59IST onwards.


Download GMetri's SAML Metadataemail/mail
urn:oasis:names:tc:SAML:2.0:attrname-format:uri
Display Name
displayname / urn:oid:2.16.840.1.113730.3.1.241
urn:oasis:names:tc:SAML:2.0:attrname-format:uri
Public - allows all emails
Filter by domain - you can provide a comma separated list of email domains you want to allow (eg: walmart.com, google.com )
Common Email Domains - allows most of the common email domains, while ensuring that disposable email domains aren't allowed.

<html>In case you don't have a website or want to set up a new one, you can use the guide below.
Example website: https://metaverse.boardroomx.com
Deployment: https://demo.gmetri.com/gmetri_event_vr_public
GitHub Repository Link: https://github.com/gmetrixr/website-metaverse-example
We will be setting up the following deployment as a Website:
GMetri Deployment: https://gmetri_demo.gmetri.com/gmetri_event_vr_public
Website URL: https://metaverse.boardroomx.com
Create a GitHub repository and enable GitHub Pages for it. To enable GitHub pages, go to that repository's "Settings > Pages", select the branch "main", and Save.
We created this repository.
Point the URL you want of your final experience to either <user>.github.io or <organization>.github.io. Check detailed instructions here.
For this example, we added a CNAME record metaverse.boardroomx.com with the value gmetrixr.github.io .
Once the DNS record is created, add the final website's hostname under Custom Domain.
Once the certificate is issued, make sure "Enforce https" is checked.
Go to the repository and add a new file with the name index.html
Get the content from Publishingand paste it into the file, and then Commit it.
Your website should now be live.
It may take some time (a few minutes to an hour) for the TLS (https) certificate to activate globally.

Select SCORM from the Authentication dropdown as shown below
Navigate to Others section in the Sharing options
Select either SCORM 1.2 or SCORM 2004 versions for export and click Download SCORM button to start downloading the file
This file can then be imported into any LMS having SCORM support
To support communication between LMS and a GMetri experience, we allow defining certain rules that can be triggered conditionally.
The following is an exhaustive list of SCORM actions that we support.
Set SCORM min score: This can is used to notify the LMS about the minimum score possible to get in the experience. This should usually be fired right at the beginning of the experience.
Set SCORM max score: This can is used to notify the LMS about the minimum score possible to get in the experience. This should usually be fired right at the beginning of the experience.
Set SCORM score: This can be used to notify the LMS about the current score of the user. Usually, LMSes show scoring after completion of the course but make sure to keep calling this action as and when the score inside the experience changes.
Set SCORM status as passed: This can be used to notify the LMS when the user has met the criteria of successfully passing the module.
Set SCORM status as failed: This can be used to notify the LMS when the user has failed the module.
Set SCORM status as complete: This can be used to notify the LMS when the module is complete. Call this action when the full experience has been completed by the user. This enables the LMS to track and show user attempts and show the final calculated score.
Set SCORM min score and Set SCORM max score actions should be added right at the beginning of the experience. Add rules to set scorm min score = 0 and set scorm max score = 100.
Set SCORM score should be called at the end of the experience when you want to relay the score value to the LMS.
Set SCORM passed/failed/complete should be called at the end of the experience when you want to relay this information to the LMS. Please note that certain LMS's don't track scores unless a rule for set SCORM complete is fired.
To test that information is correctly shared between GMetri and LMS, we suggest you to first import the test SCORM package which covers all the scenarios specified in the previous sections.
If the integration works perfectly, after importing the test package, you should be able to see the user's unique ID, be able to score the user and mark the course as completed right within the experience.
There are 2 types of data that needs to be shared between the LMS and the GMetri system. We categorize these as inbound and outbound data.
Inbound - This is the data that is required for day-to-day functioning of GMetri experiences
Learner ID - User's learner ID as stored in the LMS [cmi.core.student_id (SCORM 1.2) / cmi.learner_id (SCORM 2004 V3)]
Progress - User's progress through the course as stored in the LMS [cmi.progress_measure (SCORM 2004 V3)]
Suspend Data - Additional information stored in the LMS for course to run [cmi.suspend_data (SCORM 2004 V3 & SCORM 1.2)]
Score - Score stored in the LMS [cmi.core.score.raw (SCORM 1.2) / cmi.score.raw (SCORM 2004 V3) ]
Outbound - This is the data sent out by GMetri system that should be stored inside the LMS. This includes functions like scoring, course completion etc
Progress - User's progress through the course calclated in the GMetri system. (SCORM 2004 V3)]
Suspend Data - Additional information stored in the LMS for course to run [cmi.suspend_data (SCORM 2004 V3 & SCORM 1.2)]
GMetri experiences can be embedded on your website by using the <iframe> code in the Embed tab in the Publish section.
You can also embed this experience in your website by using the embed code.
Access the HTML editor for your website
In the HTML body, insert the code copied from the tab in Publish section
In case you are using a UI based editor (like WordPress editor), instead of the above steps (where you modify raw html), you can also try directly pasting the in the editor for the website content.
In most popular publishing tools - the deployment link auto-expands into an embed - like how YouTube links expand in most editors.
This option allows to generate automatic login tokens to login the viewers. A great way to use this feature is to autogenrate the login tokens via an API and create limited time login links.
To generate a token, create a new viewer group and select the token login method. When you select this, you will be shown a signing key, copy this signing key. This will be used to generate the login tokens.
To generate a login token, we create a Jwt token. This login token will be appended to the experience link.
The final url will look like this:
<deployment-link>?token=<generate-jwt-token>
An example url:
https://view.gmetri.com/v4/game/safehands_v2?token=34fhdf7asbfdsa09in2m1od.09u0dfa8nfdjajkbfe8uih32rjn.908ufdbsahbjfd9sabjhfdu


JSON Web Token (Jwt) is an open standard (RFC 7519) that defines a compact and self-contained way for securely transmitting information between parties as a JSON object. This information can be verified and trusted because it is digitally signed. A typical Jwt consists of three parts separated by dots (.), which are header, payload and signature. Therefore, a JWT typically looks like the following. xxxxx.yyyyy.zzzzz. More information about Jwts can be found here.
This information is required to correctly identify a viewer on GMetri experiences. The payload for the JWT is shown below (the optional fields can be set as per requirement):
identifier is the unique key by which you identify your viewers.
We recommend using npm package jsonwebtoken to generate jwt tokens on the web (both on server and browser)
An example of generating a Jwt token in node.js:
To run GMetri experiences inside android apps, we recommend an implementation of Chrome Custom Tabs API. Detailed information on how to setup an android experience with Chrome Custom Tabs can be found in this experience
In your android experience, add the required dependencies for Chrome Custom Tabs and Jwt. Following is an example of gradle build dependencies:
Information on how to install dependencies for other build systems are in the links below:
From this experience , copy two files: ChromeCustomTabsJwt.java and ServiceConnectionCallback.java into your android experience. These files together provide the interface for chrome custom tabs to run GMetri experiences.
The className ChromeCustomTabsJwt.java implements two public methods:
initialize(String viewerIdentifier, String apiKey, String url, Context context)
launch()
Arguments:
viewerIdentifier - This is a JSON string containing information for the viewer
apiKey - A unique key generated for GMetri experiences.
url - Url of the experience
context - Context of your activity (this)
An example implementation of the above classes:
To add more fields to viewerIdentifier JSON object refer to the payload section.
{
  "identifier" (required): "John001",
  "first_name" (optional): "John",
  "last_name" (optional): "Doe",
  "phone_num" (optional): "+1 000 000 000"
}const jwt = require('jsonwebtoken');
function generateJwt() {
const payload = {
identifier: 'John001', // A unique identifier for your user
first_name: 'John'
};
const apiSecretkey = "<your api secret key>";
const token = jwt.sign(payload, apiSecretkey);
return token;
} import java.security.Key;
import io.jsonwebtoken.Jwts;
import io.jsonwebtoken.security.Keys;
String createJwt(String url, String identifier, String apiSecret) {
JSONObject obj = new JSONObject();
obj.put("identifier", identifier);
Key key = Keys.hmacShaKeyFor(apiSecret.getBytes());
String jwt = Jwts.builder().setPayload(obj.toString()).signWith(key).compact();
return url + "?token=" + jwt;
}
// url is the link from deployment section sssss
String finalUrl = createJwt(url, <unique identifier>, <your api secret key>);dependencies {
implementation fileTree(dir: 'libs', include: ['*.jar'])
implementation 'com.android.support:appcompat-v7:26.1.0'
implementation 'com.android.support:customtabs:26.1.0'
api 'io.jsonwebtoken:jjwt-api:0.11.0'
runtimeOnly 'io.jsonwebtoken:jjwt-impl:0.11.0'
runtimeOnly('io.jsonwebtoken:jjwt-orgjson:0.11.0') {
exclude group: 'org.json', module: 'json' //provided by Android natively
}
} ChromeCustomTabsJwt chromeCustomTabs = new ChromeCustomTabsJwt();
JSONObject obj = new JSONObject();
try {
obj.put("identifier", "[email protected]");
} catch (JSONException e) {
e.printStackTrace();
}
String apiKey = "your_secret_api_key";
String url = "url_to_open";
chromeCustomTabs.initialize(obj.toString(), apiKey, url, this);
chromeCustomTabs.launch();Score - Score calculated in the GMetri system [cmi.core.score.raw (SCORM 1.2) / cmi.score.raw (SCORM 2004 V3) ]
GMetri XR experiences run on:
All headsets - HTC Vive, Oculus Go/Rift, Google Card
All Laptops/Desktop on chrome
All Mobile Phones
Android
Apple (Needs Chrome to be installed)
On Headsets, experiences can be run in their inbuilt browsers and simply typing in the deployment URL.
Google cardboard headsets essentially use Mobile Phones to power the VR Experience, so check the Mobile Phone section below.
On Laptops/Desktop, experiences can be run on Chrome by accessing the deployment URL.
On Mobile Phones (both Android and iOS based), experiences can be run on Chrome by accessing the deployment URL.
In case you need to embed the experience within an App or a website, follow the guides below:
In many cases, we may want to authenticate and control access to published GMetri content. There are a couple of ways to achieve this.
Embed the experience on your App/Website/etc. and keep the access to this page authenticated.
You can enable a text field at the beginning of the experience, asking users to input their unique identifier (Example. Employee ID for internal training) so you can reference that back to the analytics, if required.
This method will incur no additional charges from GMetri. (Analytics charges, of course, are extra, and optional.)
You can create as many GMetri view-only accounts for an experience as required. Example: A GMetri view-only account can be provided to each trainee for a VR training module.
In this case, the authentication prompt will require credentials that have to be defined by the user during the first login.
This is a chargeable feature, and the pricing depends on the number of view-only accounts created.
The GMetri platforms can store the following data points for any viewer of the immersive experiences:
What the user looks at / interacts with - including coordinates of the user(s)
When: The amount of time spent on the whole experience, per scene or looking at a single element
How the user interacts with his/her surroundings - including what buttons were clicked/ what actions were performed on which element(s)/scene(s), and tracking user score in quizzes.
The above-captured metrics can be combined in various ways to get may insights through Custom Dashboard. These insights may include:
User Performace/Leaderboard - by combining the total score of the user with the time spent by the user in the experience, one can estimate how well the user may perform in a real-world scenario.
Creating domain-specific dashboards focusing on a few aspects of the training to gain further insights. Eg: measuring how one handles corrective situations in client interactions, or measuring how well versed a user is with technical processes, compliance, safety, soft-skills, etc.
Dashboard to focus on user time spent, to create a feedback loop to detect and fix problems in the immersive environment itself - for example, if a user doesn't spend enough time at a particular section vs. other sections, it could have something to do with the design of the scene or the storyboarding. This information can then feed into the correction of the scene/storyboard itself, and to and any improvements may be measured over time.
Oculus that they are enabling casting options for the Go.
This came as great news to creators globally so you are not disconnected from the users when wearing the headset.
Here's how you can set this up:
There are a few legacy methods that you can still fall back on, you can find them .
The likely cause of this having the wrong initial scene.
When you preview an experience, whatever scene you are on in the editor gets previewed. However when you publish an experience, the initial scene gets shown.
The way to go directly to a scene is to add the scene_id at the end of the deployment URL like this:
https://view.gmetri.com/v5/gmetri/demo_deployment?scene_id=1639550027086
To find out the scene_id of any scene, open that scene in preview mode, and look for scene_id in the URL
It looks like you are sharing the link.
Make sure you use the Deployment link instead (preview links expire very quickly - they are only for previewing by the editor)
You need to add a rule to play a video. Like below:
Also check .
Sometimes when you try to embed a site in the EmbedHTML element, and trigger it using a rule, you might see the following error:
Entering the properties that you see above, might lead to an embed HTML like this:
This happens when the website in question actively blocks iframes from embedding it. (You can try embedding and that will work because wikipedia doesn't block embeds)
More information here:
There are two ways to fix this in case you can modify the website in question:
Remove the X-Frame-Options HTTP response header completely
Remove the X-Frame-Options HTTP response header in case you detect the request is coming from *.
After opening the deployment link in a browser, you need to click the "VR mode" button to enter the immersive mode or "left-right eye" mode to view the experience in 3D.
There are two places you can find this VR mode button - 1) in the top right menu and 2) in the control panel menu at the bottom centre of your screen.
Check


GMetri can run a dedicated cluster in the AWS/GCP/Azure region of your choice to make sure you internal compliance needs are met. Please note that you need to be subscribed to an enterprise tier license to request this chargeable feature. Contact us to know more.
There are cases where security policies demand an on-premise deployment of cloud services (firewalled zone).
For such cases, at an additional cost, GMetri supports on-premise deployments.
There will be a one-time cost that can be determined if you with the following details:
The hardware configuration of the servers on which this service is to be deployed.
Whether you use a cloud service provider like Google Cloud/AWS/Azure/Others or if you manage, provision your own servers and server racks (bare-metal).
These costs are in addition to the standard Enterprise Tier annual/monthly license cost you would incur even without the on-Prem deployment.
Ideally, within the cluster, communication needs to be open - i.e. all cluster nodes should be able to contact all ports of all other cluster nodes.
However in case a list of open ports is required, you can use the following list:
The GMETRI platform deploys as a Kubernetes cluster.
Below are the hardware and network requirements to set up a Kubernetes cluster in a private cloud that supports the GMetri platform.
Server Requirements
The following table lists the minimum requirements setting up a High Availability (HA) cluster:
On Cloud (AWS/GCP/Azure)
Bare Metal (HA Setup)
Full network connectivity between all systems in the cluster
Ability to configure open ports on these systems
Failure resilience for production servers: 1 for master nodes and 1 for worker nodes separately. The resilience is of (n-1)/2 nodes per node-type where n is the number of nodes.
We ideally recommend that GMetri is deployed on a cluster setup in a private cloud consisting of a minimum of 3 servers. However, in cases where that is not possible, GMetri can also be deployed on a single rack-server or a desktop.
Hardware Requirements
The following are the recommended hardware requirements for such a deployment:
Keep in mind that this is not a HA (High Availability) setup. This means that any hardware failure could lead to permanent loss of data. In cases where data resiliency is critical, we recommend a cluster setup.
The Operating System used will depend completely on the flavour of Kubernetes deployed. Examples are RancherOS, Ubuntu, CoreOS etc.
Preferred OS
For Bare Metal deployment: Ubuntu 18+
Partitioning
Ensure that there is no swap partition.
Network Response Time
Within the cluster, ideally communication needs to be open - i.e. all cluster nodes should be able to contact all ports of all other cluster nodes.
In case a list of specific ports is needed, refer to this .
Internet Connectivity Requirement During updates and initial installation, internet connectivity is needed. For usual operations, internet connectivity isn’t required.
Example Rack Server/Desktop Tower configuration
An example of a single rack server or a desktop tower to support the above deployment would be the following:
An example of a single rack server or a desktop tower to support the above deployment would be the following:
4 or 6 such servers/desktop towers are required to form a cluster as mentioned above.
For any other queries, write to

The protocol to open certain network ports for the servers.
There may be additional SLA charges as needed.
3000-3100 TCP 3306 TCP 5432 TCP 6739 TCP
(Part of the server/desktop)
Remaining space
ext4
Kubernetes
Specific
22 TCP 80 TCP 443 TCP 2376 TCP 2379 TCP 2380 TCP 6443 TCP 6783 TCP 6783-6784 UDP 8472 UDP 9099 TCP 10250 TCP 10254 TCP
80 TCP
443 TCP
git.rancher.io: 35.160.43.145:32 35.167.242.46:32 52.33.59.17:32
.gmetri.com .gmetri.io .vrgmetri.com .docker.io
Workload
Specific
30000-32767
TCP & UDP
Spec
Production Values
Recommended Node Type
AWS: m4.xlarge/m5.xlarge GC: e2-standard-4 Azure: D4d v4
Nodes (Virtual Machines) with vCPUs >2Ghz
3 worker nodes Min requirement for each node: 4 core vCPU + 16 GB RAM
RAM
16 GB × number of nodes
Storage (SSD Based or better)
Min 256 GB per node supporting >500 sequential IOPS
Managed DB instance*
Managed DB instances from AWS/GCP/Azure with the minimum config of 4core vCPU + 16 GB RAM
Spec
Production Values
Servers with every core >2Ghz
3 (etcd + control plane) + 3 worker nodes Minimum 4 servers on at-least 3 different physical machines (in case the servers are VMs) Min requirement for each node: 4 core vCPU + 16 GB RAM
RAM
16 GB × number of nodes
Storage (SSD Based or better)
Min 256 GB per node supporting >500 sequential IOPS
Managed DB instance
3 x 4 core vCPU + 16 GB RAM
Hardware
Specification
Example
CPU
A 4-core/8-thread processor
Intel i7-7700K
RAM
32 GB DDR-4
Corsair LPX 32GB (2x16GB) 3200MHz
HDD
256 GB SSD or SAS storage
Samsung 860 EVO 250GB SSD
LAN Ports
NO swap
none
/ (root)
20 GB
ext4
/home
10 GB
ext4
Bandwidth
5 Mbps minimum
100 Mbps minimum
Latency
250-300 milliseconds
1 millisecond on LAN
CPU
A CPU with 4 threads
Intel i5-7400 or better
RAM
16GB DDR4 or better
Corsair LPX 16GB 3200MHz
HDD
256 GB SSD or SAS storage
Samsung 860 EVO 250GB SSD
Experience
Specific
A single LAN port is enough
/var